This tutorial was made especially for Jericha! I bought this men's blazer/overcoat from the op-shop for five dollars. It was really massive so here's how I made it more fitted and feminine. The concept is really similar to my shirt refashion tutorial (link here), but the main difference was that the blazer is really thick, with several layers of lining, interfacing, and padding, so I substituted the boob dart from the shirt for an hourglass-curve on the sides of the body. And I'm so sorry that I forgot to take 'before' photos! Just imagine me wearing an overwhelmingly large jacket. The process was quite fun, so I might go back and buy a few more blazers to refine the resizing technique later! In the meantime, here's how I refitted my first men's blazer to fit myself.
STEP 1: Unpick the sleeves and lining from the shoulder seams. Take out the shoulder pads, and the L-shaped batting, and put aside for later.
STEP 2: Put on the blazer and with chalk, mark where your shoulders are. Then mark 1.5cm out from your shoulder line for seam allowance. Curve this line all the way down to the original armpits.
STEP 3: Cut this line, removing the excess fabric from the shoulders.
 STEP 4: Put the shoulder pad back into the shoulders, between the outer layer and the lining. 'Cos you've narrowed the shoulders you won't need the whole pad. Pin it in place and check yourself out in the mirror. Adjust depending on how padded you want the shoulders. Do the same for the other shoulder.
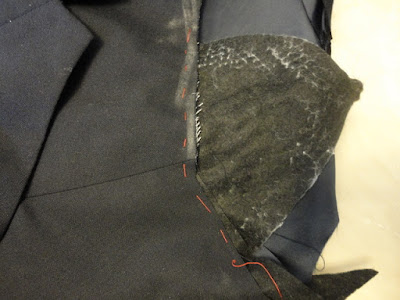 STEP 5: When you're happy with how the shoulder pads are placed, hand-sew (just really quickly, no need to be neat) the shoulder pad in place. Repeat for the other shoulder.
 This is how it looks with the bodice inside out. Make sure your stitches catch the inner lining as well.
 STEP 6: Cut off the excess padding.
 Now we're going to do the sleeves, in three parts. Firstly, we have to shorten the sleeve at the shoulders, then re-attach them back to the bodice. Lastly we'll then narrow them width-wise together with the bodice :)
 STEP 7: Put on the sleeve and mark on your shoulder like so.
 STEP 8: Cut off the excess 1.5cm away from your line (for seams). You can cut both the back and front of the sleeve together.
 STEP 9: We're going to put back in the L-shaped batting. I think this piece is there so that the shoulder silhouette less extreme as it meets the sleeves.
Turn your sleeves inside out and peel back the lining. Pin the L-pad to the outer layer as shown.
 STEP 10: Cover with the lining and pin.
 STEP 11: Tack into place (again no need to be neat).
We've just shortened the sleeve!
 STEP 12: Time to re-attach the sleeves. Turn the sleeve right-side out, then turn the bodice inside out as shown.
 STEP 13: Put the sleeve inside the armhole as shown and match the shoulder tips with the bodice.
 STEP 14: Pin the sleeve and bodice together around the armhole. Leave a bit of space at the bottom (the armpit area) so that we can narrow the width of the sleeves and the bodice later.
It's better to leave unpinned a bigger space rather than smaller- you can always go back and pin some more later.
 STEP 15: Tack together. Here the red thread is the tacking of the L-pad and sleeves, while the pink thread is the tacking of the sleeve and bodice.
 STEP 16: With the bodice still inside out, turn the sleeve inside out too. Put on your blazer.
Follow the curve of your body from the armpit to the hip, and pin the bodice accordingly. This part will be easier if you have a full-body mirror, or a friend to do it for you.
 My blazer had two side seams and I pinned my line while pinching the back side seam so that I wouldn't add a third seam.
 Here's what it looks like laid out flat.
 STEP 18: Tack it down.
 STEP 19: Try on the blazer and pinch the excess fabric under the sleeve. Pin- the excess fabric is under this 'pin line'.
Stitch on this pin line and cut away the excess fabric.
 STEP 20: Pin the excess fabric at the armhole so that the new sleeve will fit the armhole.
 STEP 21: Stitch down this dart.
And that's it! I'll post up some pictures of me wearing it soon...? Hope you all are enjoying the holidays!STEP 1: Unpick the sleeves and lining from the shoulder seams. Take out the shoulder pads, and the L-shaped batting, and put aside for later.
STEP 2: Put on the blazer and with chalk, mark where your shoulders are. Then mark 1.5cm out from your shoulder line for seam allowance. Curve this line all the way down to the original armpits.
STEP 3: Cut this line, removing the excess fabric from the shoulders.


Turn your sleeves inside out and peel back the lining. Pin the L-pad to the outer layer as shown.
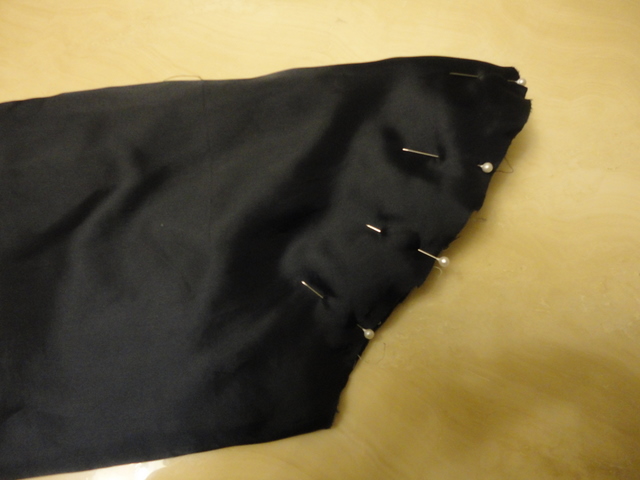

We've just shortened the sleeve!


It's better to leave unpinned a bigger space rather than smaller- you can always go back and pin some more later.


Follow the curve of your body from the armpit to the hip, and pin the bodice accordingly. This part will be easier if you have a full-body mirror, or a friend to do it for you.


Stitch on this pin line and cut away the excess fabric.


