So it's been a while since my last tutorial - here's one from a pair of granny pants I bought for $3.00 at the op-shop. I made this because I really need some fitted pants for work- I'm starting an internship soon at an office, and when I went there for my interview, all the women were wearing work slacks. These 'granny pants' were tagged from Miller's, which is a sort of older brand- the type with lots of kaftans, oversized shirts and waistbanded slacks. It has an elastic waistband with three belt loops and sort of looks like a pair of crepe trackies. They were two sizes too big for me, so I made them smaller by adding in a few pleats and adjusting the leg width. As always, this is what I did for my pants and might not be exactly the same for yours- please read all instructions beforehand :)
STEP 1: Unpick the belt loops and stitches from the waistband. This will take ages if your waistband looks like mine, with four stitch lines running through the elastic... but when you finish it will be hugely satisifying, trust me! Remove the belt loops and elastic and keep in safe place for later.
STEP 2: Measure around your waist/hip, depending on how high you want your trousers. I chose mine to be just above the hip (84cm).
Halve this measurement (I got 42cm).
Basically we want the front waistline to be this measurement (42cm for me), so we need to make the waist smaller till we reach this.
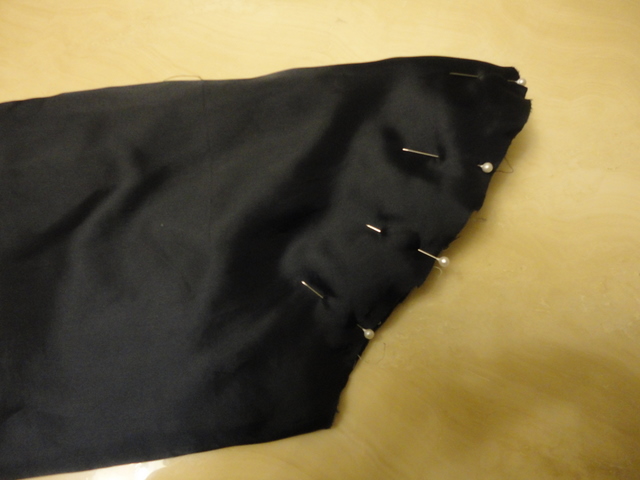
STEP 3: Go ahead and pleat! Taper it down at the bottom. It's probably more accurate to say that these are just massive darts.
I made four pleats, going from on pleat the right to the left for the second pleat, then again for the third and fourth pleats- just to make sure it's all even.
Pin down your pleats at the waistband, and at the end point of your pleat/dart.
STEP 4: I turned the pants inside out and pinned down the darts, removing the pins from the front.
I'm not sure if you can just substitute this step for Step 3. I just did my pleats with the pants right-side out first because I wanted to see what they'd look like from the front.
STEP 5: Use a straight-edge to make sure that your tapered ends all finish at the same length. (So that they're not longer than each other).
STEP 6: While the pants are still inside out, stitch down your darts. Here they just look like little triangles.
STEP 7: Iron down your darts.
Here's what they look like from the front :)
STEP 8: Measure your crotch depth. You can do this by sitting down on a chair and measuring the height from the seat to your waist/hip (it's your waist or hip depending on where you chose your pants to sit. I measured to my hip- 20cm). Add 2cm to this measurement.
Fold down the waistband as it would be with the elastic replaced, and mark your crotch depth (with the added 2cm) with chalk. On the photo it's the blue line.
We're going to slim down the inner-leg, so this measurement will make sure that we leave enough allowance for your crotch and butt areas.
STEP 9: Fold over the little flap, and with a straight-edge and chalk, draw the line where you want to sew your new inner leg. Make sure it's below your crotch depth line!
We're going for a tapered slack, so that's why we're not being super exact with how slim to make the leg.
STEP 10: Do the same for the other side.
STEP 11: We'll leave the inner leg for the outer leg for now.
You can try on your pants at this point just to check how much more to take in at the waist.
Turn them inside-out again and use chalk to mark a new seam on the outer edge of the legs. Your line should point towards the inside of the pants as it travels down the leg. Draw the curve from the waistband to the pocket, following the original curve.
STEP 12: Stitch your new outer leg seam, following your chalk line.
STEP 13: Make sure that your pants are still inside-out, and that the front of the pants with your pleats is face-up.
Cut the inner leg, 1cm away from your chalk line for seam allowance. Only cut the front of the pants!
This is because we want the back pieces to be slightly bigger to allow for your butt.
STEP 14: Cut the back inner legs, about 1cm lower than the cut you made for the front legs.
STEP 15: Match up the cut edges, and pin together. Sew on your chalk line.
STEP 16: Try on your pants! They should still be a bit big at the back and just right at the front.
Turn them inside-out again and cut off the excess fabric on the outside leg.
STEP 17: Iron open your new seam. This step is really important for that polished look and will help your pants lie flat.
STEP 18: Finish your seams. I zig-zagged mine twice.
STEP 19: Almost there! Using the elastic we saved before, stretch it on your back waist/hip comfortably. The length should be smaller than, but can stretch out to, the first measurement we took (waist/hip circumference halved).
Cut it.
STEP 20: We're going to fix up the extra space at the back with the elastic.
Mark the middle of the elastic you cut.
STEP 21: Stitch down the elastic at the centre, to the centre back.
Then stitch down both ends of the elastic to the left and right of the back waistband.
STEP 22: Fold over your waistband to enclose the elastic.
Stretch the elastic to match the cloth as you sew.
Once you have finished enclosing the elastic at the back, keep going around the waistband to the front, folding over the front waistband as it was originally.
STEP 22: Reattach your belt loops. Done!