Apologies for the delay on the first of my promised mini-tutes! Summer seemed to pass by with just only a few warm days! Global warming's a sad occurrence.
Another thing that's sad is the recent natural disaster in Japan. This country is especially dear to me as I lived there for a year on exchange during my high school days. Last night I called my host family, they live in Osaka so they were fine, although my father was in Tokyo at the time and the phone service was cut for following the quake, which made for a few shocking hours for my family. I'm not sure if anything I say may provide comfort, but I am so sorry Japan... I can't imagine how reminiscent the resulting nuclear accidents are of Nagasaki and Hiroshima.
Oh! By the way, if you are feeling charitable why not make this simple t-shirt and send it over to Japan?
Here's a tutorial for making a loose t-shirt. First, we'll make the pattern for the t-shirt. Then we'll put the pattern to cloth to cut and sew the t-shirt.
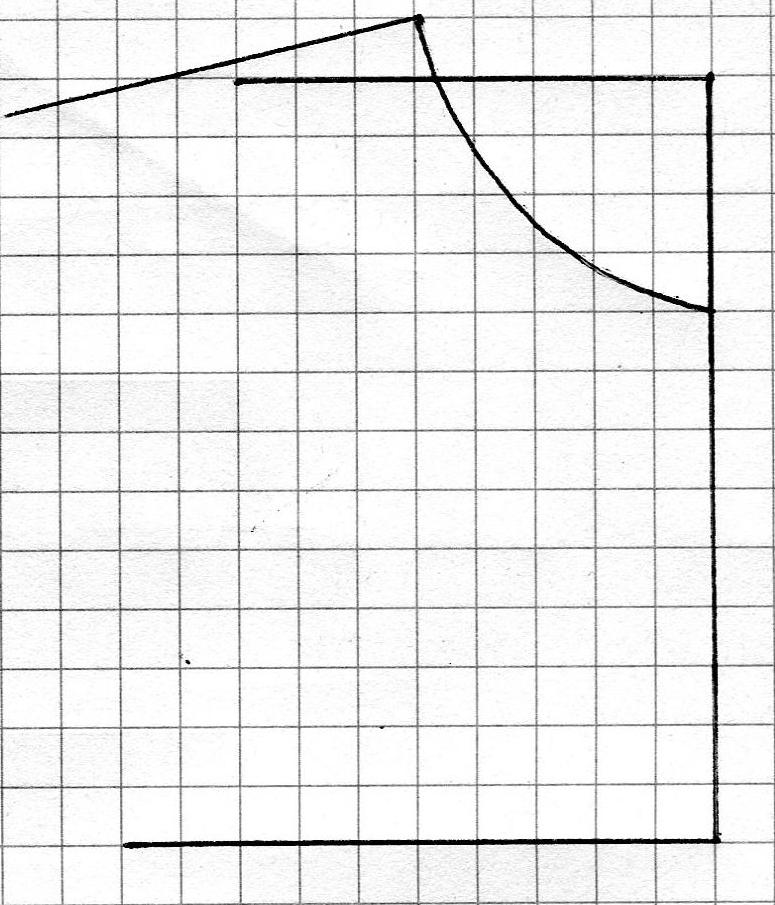
PATTERN:
Step 1: Measure across from shoulder to shoulder. Add 4 centimetres to this length, then divide the total by 2. Draw this line.
Step 2: Measure downwards from the collarbone to hip. Add 20cm. Draw this line.
Step 3: Add 2 centimetres to your line from Step 1, and draw a line of this length on the bottom of your box.
Step 4: Estimate your neckline, however wide you like, and draw, extending 0.5 centimetres above the top line.
Step 5: Draw the shoulder line, connecting with the end of the first line. Extend it 7 centimetres from the end of the first line.
Step 6: Measure downwards from your shoulder to your armpit, add 2 centimetres. Draw in this line for your sleeve.
Step 7: Draw a curve from your sleeve to the bottom line. It should go in as far as the end of the top line.
Cutting & Sewing:
Step 1: Fold your fabric. Lay out your pattern with the straight edge on this fold. Pin your pattern to the cloth. While the fabric is still folded, cut around your pattern, leaving 1cm around the perimeter for the seams.
Step 2: Unpin your pattern. Repeat Step 1 on the remaining fabric. You should now have two pieces for the back and the front of your t-shirt.
Step 3: Pin together your two pieces as shown (the shoulders, underarms and down the side). Stitch 1cm in from the edge.
Step 4: Hem the collar, the sleeves and the bottom hem. Iron open your seams and neaten the edges with a zig-zag stitch.
Your loose t-shirt will look something like this!
Lastly, a major shout out to Citrio, TxDivaDoll, Navera and Clara- thank you so much for following this blog!
Feel free to post any questions or comments below :)


I'm loving it! Definitely going to try it soon :D
ReplyDelete-Navera
Thanks Navera! Let me know if the instructions aren't clear & email me photos ;)
ReplyDeletethanks a lot, have already tried it.will finish soon
ReplyDeleteThanks Tshedi for the feedback and your kind email! Can't wait to see your finished tshirt :)
ReplyDeleteare there any more pictures of how this looks on a person by any chance??
ReplyDelete- rachel
Hi Rachel, I'll take some photos. Check back next week for more pictures! Thanks for your request.
ReplyDeleteHi Rachel (again!) :)
ReplyDeleteI've posted some photos of the tshirt on me- you can view them here: http://jltfk.blogspot.com/2011/04/loose-t-shirt-2-more-pics.html. Hope that helps!
thanks so much!!
ReplyDelete- rachel
hey! just wondering what material you used to make this shirt. x
ReplyDeleteHi there! Sorry for the late reply! I went to the fabric shop to check - it's '100% polyester' however I'm not sure if that helps since there were several different-looking polyesters! I bought mine from an op-shop and it's loosely-knitted synthetic fabric. It doesn't wrinkle which is really great. Sorry for not knowing for certain!
ReplyDeleteThank you so much for this tutorial. :) It's great.
ReplyDeleteThanks! Hope you enjoy making and wearing it!
ReplyDeleteV.S. Ramadass, Bangalore
ReplyDeleteThanks for the tutorial. It is very nice with simple instructions to understand clearly which creates in me more
interest to know more about cutting & sewing a regular slack shirt with sleeves completely. Please provide such
a tutorial.
V.S. Ramadass, Bangalore
ReplyDeleteThanks for the tutorial. It is very nice with simple instructions to understand clearly which creates in me more
interest to know more about cutting & sewing a regular slack shirt with sleeves completely. Please provide such
a tutorial.
Thank you for your tutorial! I was wondering what your grid measurement was. Is it 1 cm increments?
ReplyDeleteHi Paleseptember, the diagrams drawn on grid paper are only very small markings to indicate what your pattern may look like when following the tutorial. They are not drawn to any particular scale so would not be suitable to use as a print-out pattern. I would encourage you try the tutorial and create your own unique pattern to perfectly fit you! :)
DeleteThank you for your reply!
ReplyDeleteso do i use a square centimeter grid for measuring
ReplyDeleteHi Stasia, it doesn't matter what paper you use, the pattern will fit you if you use your body measurements! Hope that helps!
DeleteThanks, i think i will try this it looks very good. Nice job!
Deleteone more question, how big was the newspaper you used?
ReplyDelete